Sunday, October 7, 2012

Classroom Cooking 101


I do a LOT of cooking in my classroom. I'm very fortunate to have a kitchen attached to my classroom. Some teachers find cooking to be a daunting task, but here are some tips I've amassed over the last seven years that make things much easier! 

1. Preparation is key
Look over your recipe the night before. Make sure you have absolutely everything you need: all the ingredients, bowls, spoons, mixers, etc. It can be disastrous to get halfway through a recipe with your little ones and realize you've forgotten something important!
Here are all my supplies laid out, apples already peeled and cut!

2. Prep as much as possible before
For example, if your recipe calls for 6-7 apples peeled and sliced thin, make sure that is done before you start! You will not hold your students attention if you have to sit there and peel and slice them all in front of them! I'm lucky that my kids go to their arts classes first thing in the morning so I prep as much as possible then. I also make sure to have my recipe written out on chart paper. I like to leave blank spaces to make it interactive and so the kids can follow along and help me fill it in as we go. I also always have a student copy for them to fill out. This keeps them engaged. 
My recipe written out on chart paper and ready to go

3. Involve your students as much as possible
I already mentioned having them follow along and fill in their own recipe, but if there is mixing, measuring or pouring to be done - let them help! They take such pride in being teacher's helpers. 
one of my sweeties helps mix, while the rest follow along with their own recipes on white boards.

Our recipe after we filled it all in. The kids help sound out the missing words.

4. Take advantage of teachable moments
There is so much kids can learn from cooking. I always start by talking about recipes - what is on it? (title, ingredients, steps) What does it show us how to do? (cook or bake something) Can we skip steps? (no!) Why not? (your final product won't turn out right!) Should kids ever touch the oven? (No! This is a job for grownups, ovens get very hot and children can get hurt). 
One of the students recipe, after it's been filled in.

5. Always plan for clean up
A mess is going to be inevitable. No matter how hard you try to contain it, there will always be a mess when you're cooking with kids. My solution for this is to finish the recipe, get it in the oven, then send the kids off to do an activity while you clean. The key here is to make sure the activity is something they can do INDEPENDENTLY. They can work on it without needing your help, and you can clean up while still keeping an eye on them and making sure they are staying on track. This gives you time to sweep up crumbs, wash out dishes, pans, utensils, etc. 
My students worked on labeling an apple's parts while I cleaned up.
7. Lastly, always try to find a literary connection
For example, I always preface our apple pie baking by reading "The Apple Pie Tree." We talk about what happens to an apple tree in different seasons, and the steps the sisters when through to make their pie. Then when we are baking, the kids can make text-to-self connections. This also helps put everyone on a level playing field with what will be happening, even if they have never baked an apple pie before. Background knowledge makes a big difference in connections and cementing information in their little brains. Take advantage of it whenever you can! 
And that's it! It really can be a painless, fun experience for you and the kids! I'm currently working on a unit entitled "Kids in the Kitchen" that will be full of my favorite classroom recipes, literary and math common core connections, and more tips! I hope to have it done soon! 

Saturday, October 6, 2012

An apple a day.....


Whew! It is sure a challenge to fit in all our normal fun stuff with all this new common core stuff! Here's some of the apple stuff we did this year, though it's only a fraction of what we did last year. You can check out last year's posts HERE and HERE. 

We started by learning about Johnny Appleseed. We made a character map all together, then the kids made their own (sorry no picture). 
Then we tasted a red apple and described it using our five senses. The kids also filled out their own.
This is part of my Johnny Appleseed mini unit

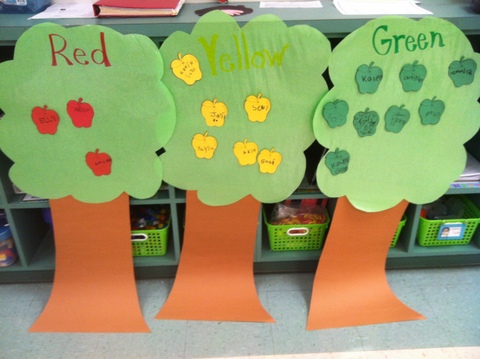
Then we tried yellow and green apples too. We graphed which was our favorite and analyzed our data. Tree graph idea is from Deanna Jump's apple unit. The graph is from my Johnny Appleseed Mini Unit. 

We also taste tested apple juice and applesauce, and graphed which we liked best. This is also from Deanna's apple unit. 
There were a few other things we did that I don't have pictures of - like sequencing apple life cycles, labeling apple parts, and learning how apples get from the orchard to our supermarkets. 

But probably the kids favorite was when we baked and ate our own apple pies! I'm going to be back tomorrow with more pie pictures and some tips on baking in the classroom, but for now I'll just share a few pictures of our apple pies! 


It was a delicious week!
Next week we're moving on to Christopher Columbus......


Sunday, September 30, 2012

Florida Friends....


Will any of you be at the Kindergarten conference in Orlando at the end of November? I’ll be there and I would love to meet  any of my bloggy friends that will be there too! Meet up anyone?

* I had to add my Disney friends to the picture, because everyone knows Orlando is home of the most magical place on Earth!!

Saturday, September 29, 2012

We're Authors!!!

We did it!!! We made it through Lucy Caulkin's Launching Unit - can I get a hallelujah!!!!! We've set up our writer's workshop, established procedures, and we're all on the way to becoming fabulous authors! 
The kids learned all about revising when they picked out their best piece and fixed it up by adding more details and labels to the pictures and adding more words to make their meaning more clear. Then it was time to publish! If you're interested in the Writing Clip Chart, click HERE. 
On Friday we had our author's celebration and shared our fixed-up pieces with our classmates. They were so proud to share their pieces! I don't have pictures of all the kids (I teach writing to two classes and therefore have 36 writing students) but here's just a few sharing their awesome work! To present their work to the class the kids got to sit in my "big chair" as they call it, which they absolutely loved! 


It was a blast and the kids did such a great job being a respectful audience for their peers! 

We've been learning all about apples using my Johnny Appleseed mini-unit and I'll be posting about that sometime next week when we finish it up. 

I'm also already looking ahead to Columbus Day, I have a brand new Columbus Day mini-unit aligned to the Common Core: 

We've also finished up our Third Grade Common Core Checklist, so if you know a second grade teacher in need of that, send them our way! Fourth and Fifth grade will be up soon!


AND, I'm done with all my Reading Running Records, FLKRS and ECHOS! Can I get a holla from my Florida friends?? What a relief!!!

Sunday, September 23, 2012

Assembling Little Books


I get lots of questions/comments on my little reader sets and how I fold them, or can I change them so they can be folded without cutting? I'm here with good news.... they can be folded, as is, with NO CUTTING involved! Follow these simple directions to fold them, and they will be much sturdier than if you cut them. I like my books to be sturdy enough to stay in my kids book boxes and be read over and over and over during read to self! 

1. Copy all the pages, and sort into piles by page (or have your copier do that for you!)

2. Take each page (you can do several at a time) and fold it so the wrong sides are together. 
3. You'll end up with one page on each side. 

4. If you folded several at once, separate them and stack them in a pile. Continue folding all the pages this way until you have a stack of each page. 
5. Take one of each page and stack them together. 
From the top it will look like this:
6. Then staple the pages together on the open end. 
7. Continue until all your books are done, and you've got sturdy little readers that will last all year! 

*The book in the pictures is just one of the eight stories in my Little Readers for August and September packs. If you are interested in my little readers you can find them there:


My Little Readers Set for December & January should be done in the next few weeks!