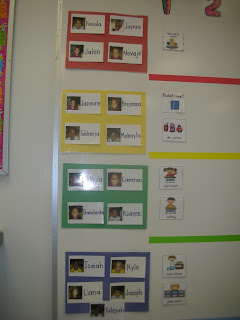
Here is how I organize my centers:
Each student is assigned to a group on our work board, either red, yellow, green or blue:
Within their group they have a partner (or two) with whom they work. Each row is a partnership.
Next to their names is the centers they will go to. There are four pictures next to their names for center 1, 2, 3, and 4.
During the first rotation the red group comes to the guided reading table and everyone else goes to their center under number1.
Each center is labelled with a picture that corresponds to the picture on the board so everyone remembers where to go.
After 15 minutes we clean up and get ready to rotate. Everyone goes to the center located under number 2 next to their name. This continues for rotations 3 and 4.
This picture shows what my room looks like during centers, with students working in different areas:
Also next to each partner group at the end of the row is their math center for the day. These are the numbers under M for math.
Each group goes to one center Mondays & Wednesday and we rotate the centers until everyone has had a turn. Then I switch out the activities in the centers. The math bins 1-5 are labelled with corresponding number pictures.
The table where they do that bucket is labelled with a matching picture so they know where to sit:
And the shelf also has the same matching picture so they know where to put the bucket back.
Center 6 is the computer, and 7&8 come to the teacher table.
I know there are many, many great ways to do centers. This is the way the majority of the teachers at my school were doing centers when I started there 6 years ago, so this is how I do them too!


Hi Rachelle
ReplyDeleteI love that you have a label so they know where to put the baskets back! Great idea to help with the tidy up!
Rachelle - in New Zealand