

This post could alternatively be titled "what works for me" because lets face it, there are a million ways to do centers, and what works one year with one class, might be completely awful another year with another class. Here is what currently works in my classroom.
I start off at the beginning of the year SOOOO slow. I introduce only one new center (and for that matter, one new activity at each center) each week. Before I ever let the students take over ownership I model, model, model, and we talk about what you should and shouldn't do at the center. After all that talking and modeling, we role play and take turns showing each other what behavior should and should not look like at our centers. Even then, I often have to revisit behavior during centers. It's an ongoing process and you just have to have faith that it will get better the more they practice.
That being said, the very first center I teach is the computer center. I am lucky to have six computers, so 1/3 of my class can be there at a time.

The very first week I rotate six kids through each day while the other 2/3 of my class plays a literacy game or has story time with me. The first week I introduced my class to starfall.com and the second week to tumblebooks. We will eventually start working on istation once they are more proficient at typing in their student numbers and passwords.
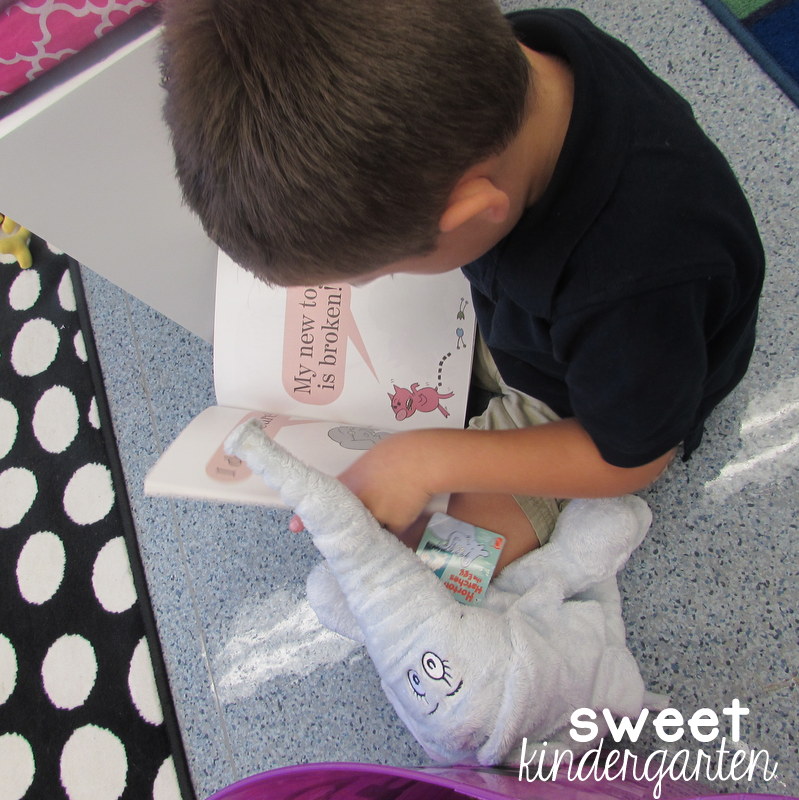
The second center I teach is read to self/ book boxes. I call them book boxes, just personal preference.

As I cycle students through this center they choose good fit books (at this point just ones that are interesting to them since most don't have a reading level yet) to fill their boxes. Once they have a box of books they choose a mini rug throughout our room to sit on. They also have the option to take a stuffed reading buddy with them to read to, so long as they read to it and don't play around with it. If I see them playing around with it, it promptly goes back into the bucket.
At this point, our second week, I now have six kids on computers, and six kids doing read to self each day, and the remaining six are working with me. (usually on beginning of the year assessments.) The amazing labels you see in these pictures are from Kinder-Craze. Her library labeling pack can be found HERE.

Once those two biggies are out of the way and students are working at them well, I begin introducing our other centers. Some of these require teamwork, so putting these ones off a few weeks gives me a chance to see who should and shouldn't work together for maximum cooperation.
The writing center is usually the next center introduced because it can be done as an individual activity or working together with a partner. This year the first activity I introduced there was a handwriting activity.

I printed out free alphabet handwriting sheets from The Moffatt Girls and slipped them into plastic sleeve protectors I got off Amazon. I set them all in a tub at the center along with a cup filled with dry erase markers. My markers have erasers built in on the cap, but that would be something else to think about if yours don't.
Lest you are starting to think I'm an expert at running centers, let me shatter your preconceived notions for a minute. Friends I can't even tell you how many times I modeled this activity. We talked about where you can and can't use the dry erase markers, how to trace the letters, how to erase it clean for the next person, etc. etc. etc. Over, and over, and over. I still had two kids who took dry erase marker and wrote all over their faces the third week of school. True story.
The second week of the writing center I started introducing a color activity since we had been working on our color words. Students could use the color cards to write six different color words and draw an accompanying picture. This activity is part of Kindergarten Smiles Writing Pack which I love, love, love, and you can find HERE. I made the color cards so my students could have some extra support and you can find those for free HERE.

Next up, the magnet center. I set up my magnet center on the side of my big eye sore filing cabinets, but you could easily use a magnetic white board or even cookie sheets. This is one of my students favorites. I use a variety of activities here, including some magnet board activities I got from Lakeshore Learning, but the first few weeks I keep it simple.

I printed this letter matching activity from Kindergarten Smiles September Word Work Pack, (found HERE) and the students match up magnetic letters to the letters on the cards. I keep two tubs of letters at the bottom of the center so that students aren't all crowded around fighting over one bucket. I also keep a mini rug here also for the students to sit on while they are working.

And the final center that I've introduced thus far, is the word work center. My students complete this center on our large rug at the front of the room not far from my guided reading table. (Where I can keep a good eye on them since these activities require them to work together nicely)

I keep a laundry basket right near the rug and inside are tubs with games that have been stored in pencil pouches. Each pouch has an instruction card and then all the pieces needed for that activity. The students can choose out a pouch and work together to complete the activity.

Thus far they have been introduced to an alphabetic order game, and a letter/sound match up game.

Both are from the September Word Work Pack I was telling you about earlier. Later in the year as my students become more proficient at these activities I will leave clip board with recording sheets and pencils in the laundry basket too so that they can complete a recording sheet after finishing an activity.
There are two more centers that I have not yet introduced that my students will start in the next few weeks. The first is the listening center. Here I have tubs of books set up with their corresponding CD and students can choose one to listen to. Eventually this one will also have a recording sheet too.

And the last one is the Ipad station. Here the students can sit on the stools and use many of the same learning tools that they would use on the computer. I am always looking for new (FREE) apps to introduce to my students so if you know any good ones please leave me a comment!

I have a new charging station this year that I am hoping will help the students be more independent in keeping our Ipads charged up!

Now, let's talk logistics. There are two times of day that you may find my students working on literacy centers:
1) during iii (intervention time) ALWAYS. This is half an hour EVERY morning that I work with my struggling learners and during that time the rest of the class does centers in pairs.
2) during reader's workshop. This only happens at the beginning of the year while we are still building up our read to self and read to a partner stamina, and later in the year when I have testing that needs to be completed, or as a special treat. Since MOST of the class is working in centers during this time, they work together in groups of three.
Since my iii center time happens every day we work on a 5 day rotation schedule Monday-Friday. My struggling learners are automatically with me, and then everyone else is given a partner, advanced kids paired up with proficient kids.

During reading time I have my groups of three on a six day rotation, same as our fine arts. This way all six groups of three kids each get to cycle through everything. These are heterogeneous groups (one struggling, one proficient, one advanced student each) so that they can rely on each other and work together for support.

I use center cards in mini pocket charts from target on my center board so that my students can easily look each morning and see where they go.

I taped my rotation schedules right next to the board so I can easily change them at the end of the day. You can see them here to the left of my centers board:

My center signs are 4x6 and made to fit in plastic upright picture frames from Michaels. The frames are a steal at only $2 each and come in other fun colors besides hot pink. I then made the rotation cards to match. I am sharing my signs and rotation cards HERE for free, but please be advised that I don't have time to make any changes, add any other centers, or make them editable.
And that's what works for me! I'd love to hear what works for you if you do something different or if you have any tips!
This looks like a very structured and organized way to introduce centers! Thank you for sharing!
ReplyDeleteWhere did you get your iPad charging station??
ReplyDeleteLakeshore learning :)
DeleteThank you. This is very thorough and helpful.
ReplyDeleteThank you. This is very thorough and helpful.
ReplyDeleteFirst time I see your blog, it is LOVELY! I really like the way centers are introduced.
ReplyDeleteThank you for sharing!
Janice
www.prekpartner.com
So within those centers that you outlined
ReplyDeleteDo you change the activities as well as time
goes on? For example the magnet Center...
Yes! I change them out every month :)
DeleteHello Mrs. Rosenblit,
ReplyDeleteI am really interested in knowing more of your word work center and how can I purchase the instructions cards.
The "I Can" cards is something my appraiser would like to see more of in my classroom. Hopefully there is an editable version so I can differentiate the instructions and use other TPT word work activities. Hopefully you can facilitate my work and make my life much easier for the back to school new year.
Liz
They are from Caitlin Clabbys word work packs, each game comes with an I can card that explains it.
DeleteThese are fantastic ideas. I appreciate the reminder to start out very slow, which reduces frustration for our kiddos and ourselves. I'm excited to try out some of your ideas. Thanks so much for taking the time to share them.
ReplyDeleteHi love it!! Where did you get your Center signs from?
ReplyDeleteThanks
Love this! So organized and easy to understand timeline for implementation. Question...does each group of 3 only do one center/day? How long is your reading time where students are in centers?
ReplyDeleteI love these ideas! Where did you get your magnetic letters? Mine are big and I don't know if they will work. Thanks!
ReplyDeleteI'd love to hear more about how you work with heterogeneous groups during reading time. I group by ability so my higher kids can be challenged and my lower kids can get the support they need at their level. Maybe I'm just not understanding what you are saying or missing something. Thanks for your time.
ReplyDeleteThis comment has been removed by the author.
ReplyDeleteWow I love your ideas and the way you have organized your centers. Thanks a ton for sharing these wonderful ideas.
ReplyDeleteWow I love your ideas and the way you have organized your centers. Thanks a ton for sharing these wonderful ideas.
ReplyDeleteThis is SO helpful! I have wanting to change the way I do stations. This is exactly what I needed to know. THANK YOU for taking the time to help your fellow teachers!
ReplyDeleteWhat do you use for the SmartBoard center? Thank you!! :-)
ReplyDeleteThank you for your ideas. You gave me something to think about... My reading workshop includes mini-lesson that follows with independent reading time (book boxes) and then shared reading, read aloud, and literacy centers in the first half of the year. We are building stamina, so that independent reading time increases slowly and then eventually there is no time left for the centers. Guided groups are taught during the independent reading time. In my literacy centers I include Big Book Reading Center and I let the students use my easel and nice looking pointers. They re-read big books we read as a class during shared reading. Another center I use is oral language development center (I teach in a dual program where at least 80% of students learn in their second language). I have an adult at this center since there has to be a model who can pronounce the language correctly and the children play vocabulary games with picture cards at first, then they progress towards role-playing a story/ retelling using pictures and so forth. I hope that you will find my info useful as well.
ReplyDeleteThanks for your kind information.So all the point which as you mention i am totally agreed .
ReplyDeletethank for sharing the link
gclub online
goldenslot
this is definitely great information for a newbie teacher such as myself....
ReplyDeletethank you. i will be using many of your ideas the first weeks of school.
ReplyDeleteCan you be more specific about the photo frames from Michaels. Did you find them in crafts or online under frames? Great ideaa. Thank you.
ReplyDeleteI pad games/things your students can do are Seesaw-a journal and sharing kind of app., Duck, duck moose, a math & story app that lets them record and explain, and Abcya to work on skills.
ReplyDeleteLiz Westside Elem. 2018